• A friendly and periodic reminder of the rules we use for fostering high SNR and quality conversation and interaction at Stormtrack: Forum rules

    P.S. - Nothing specific happened to prompt this message! No one is in trouble, there are no flame wars in effect, nor any inappropriate conversation ongoing. This is being posted sitewide as a casual refresher.

Streaming IP Camera (Dome camera)

I have been working on turning an IP camera into a dome camera option. The IP cameras house everything you need with the PTZ (pan-tilt-zoom) all built in with the camera leaving you only with the need to find a way to protect it. There are even waterproof PTZ IP cameras out there, but not worth the risk to me (even at $33 on ebay). The HD versions (720P) are not that expensive either.

Still a long ways to go on this project, but wanted to share a couple of the issues I have overcame since there is not much out there on the interent using these cameras in this manner (especially in relation to storm chasing and streaming from the road). I still need to build my box, but have the design already worked out for the msot part. Probably going to go with 1/8" acrylic this time, to save a little money. May be a risk, but I wont ever be in that size hail... most likely.

(This was done with Foscam 8910w IP camera, ManyCams 4.0, on a laptop with Vista 64 and has an ethernet port. Your results may vary)
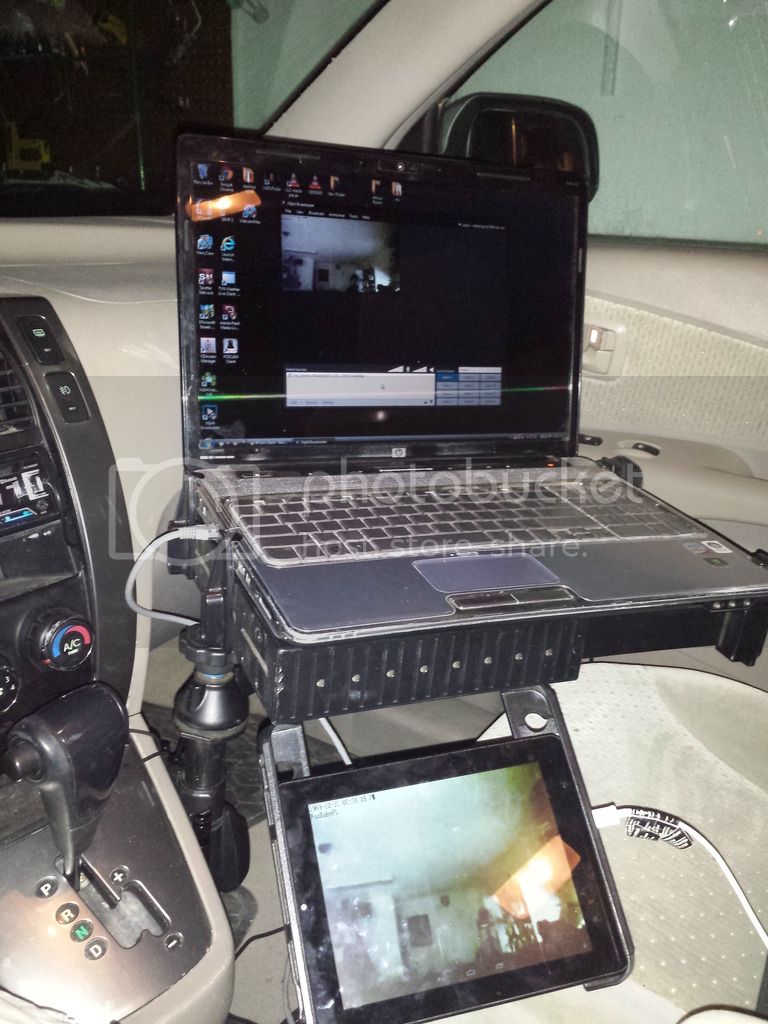
The biggest hurdle in getting this type of setup to work is getting the PTZ video to your laptop and still having working internet as well. Will need a couple things, on top of a laptop and IP camera. First, you will need the Pro edition of ManyCams program. Second, you will need a router. The camera will need to be setup just as if you planned to stream out to the internet as described in this Foscam manual. If you have that setup and working (including the router setup correctly), that will make your life a lot easier. The router will need to be hard wired (cat 5 cable) to your laptop to one of the 4 ports. Other than the power wire, that is all you hook up to it in your car. The IP camera will only need a power wire ran to it on the roof. You should now be able to get internet to your laptop through your USB datacard or how I tested with wifi Hotspot through my phone. You will also be able to control your IP camera and it will be detectable in Manycams (therefore other streaming programs you might use). I only did a basic test this evening and it seemed to work as expected, but I will be doing more test over time.

I built a dome back in 2011 to house a regular HD camera under an 18" diameter dome. It was massive, heavy, and added a ton of drag. Also got way too much attention. I had ventured away from even usine my dome over the last couple years. Streaming is not my main concern, as I just miss being able to see any direction as I chase solo in most cases. It is a safety feature first and foremost to me. This setup will use an 8" diameter dome and should sit mostly below my fairing on my roof rack (other than the dome, which should have minimal drag). This setup could cost you as little as $150 if you already have a roof rack on your vehicle (and a laptop, power inverter, and the tools to build the box). Cameras can be had for under 50. Dome is $30 on ebay. ManyCams Pro software is $40. A sheet of plywood should only cost $10-20. Old routers can be found for $10-20 as well. Without a doubt the cheapest dome-type option out there.

I will be adding to this as I get further along with this project. If you have any questions about anything, just let me know.
 
I'm interested in the output quality you get. Even with a regular camcorder in the dome, I can't really use my setup for situational awareness unless the storm is super high contrast. Anything partially rain wrapped and the quality loss and low resolution on the webcam software makes it really tough to discern any features.

I too am getting away from a dome setup. Unfortunately I'm going the other direction in terms of size and obtrusiveness in the hopes of getting better image quality.
 
Given my IP camera is only 640x480, there is definitely lost resolution. I am going to keep my eye out for one of the models that do 720 just for a boost in resolution. Also still not sure how the focus will react to rain with these cameras, though I think they are locked on infinity focus. The difference between webcam and HD camera quality was really minimal once shrunk on the computer screen, so the loss is minimal. I would rather have a quality camera up there, but I dont have the resources (money/time/skill) to solve that. I think this setup will fit my needs better though. Not to mention is should be under $50 for me with the materials I already have. Also since all my recording will be done straight to the computer, I can use the computer mic and have all the in-car banter recorded straight to that video. One issue I could never work out on my bigger dome. I miss having a dome on my car, but I didnt miss the frustrations that the large dome brought. This smaller one is designed to eliminate all the issues I had with my first build.

Another plus to this setup, you can also control the camera with your phone (or an old smartphone, which will be my backup). Plenty of apps in the app stores already out there for this. Will just have to connect the phone to the routers wifi.

I will say though, if you are not comfortable with adjusting router settings and IP address issues, this setup could be a major headache to get set up. I will try to get screenshots of everything eventually to have some examples. I can help anyone out if they get stuck on something. Also, when it comes to building a box, search for other threads on here as they are load with valuable information. Key is that the box can breathe (so it does not fog) and that water can not get in easy. Couple small holes on the bottom should do the trick and slanting the holes should reduce the leaking chances.
 
I am officially done with the build on this thing and have had a successful test in getting it to stream.


As for the box itselfs, it is made up from 1/2" plywood. I cut a 10"x10" bottom base board and then a 12"x12" top board that has a 9"x9" cut out of the center . I cut strips of plywood for the side walls and then drilled out holes and screwed everything together. 2 small hinges hold on the 10"x11" lid that has 6" diameter hole cut in it. I bought a 8" diameter (4" high) dome with 1/4" thickness from http://www.cleardome.com/, which was $40 shipping included. This dome is screwed into the lid. The box was spray painted matte black to reduce reflections and to help seal the wood after applying wood glue into the gaps. I then wrapped most of the box in black Gorilla tape to help strengthen and seal the box some more. My previous box was not wrapped in duct tape initially and it began to erode on the from bug strikes and the wind. Between the lid and the box, I put a couple layers of some weather stripping to help seal that gap. There is 1 small hole in the bottom corner of the box for the power wire. The base also has to slanted drain ports (breather holes) to keep the box from fogging and to allow any water that does get in to drain out. The lid is held down by door latch (from Lowe's) that applies pressure to keep the lid tight.


It is mounted on my roof rack of my 2005 Hyundai Tucson, to my Thule cross bars (that I had bought to mount my previous camera dome to my old Jeep Cherokee back in 2011). The box has 2 1/4" aluminum bars bolted to it with lock nuts, which the bars are what bolt to the Thule cross bars. I am using bicycle seat bolts to attached it to the cross bars. This allows me to install/uninstall without any tools and to do it fairly quickly. It only has 1 wire running to the box, the power wire, so can throw it up on the roof in a matter of minutes. My previous dome took way too long to mount, so this was my solution to speed up the process.


Another advantage this dome build has compared to my last is that instead of sitting entirely above my cross bars, the box hangs mostly below the bars and behind my wind fairing. The dome is the only part that sticks above my actually roof rack and the fairing should push most bugs over the tiny dome. Will be interesting to test and see how clean it stays.


As far as setting up the IP addressing, the Foscam manual is easy to follow. On the router, all you need to do is set up the Port Forwarding on the port you selected. After following those steps in the manual, the camera will automatically connect to the router when both are on. I just run a ethernet cable from the router to my laptop to give me access to the IP camera, as it in on the LAN. Seperately I can connect my phone's hotspot through wifi to give me laptop internet, or through my data card (which I have not officially test yet). It might be a good idea to set the priority of the LAN behind whatever you use. Having the Cat 5 cable plugged in and wifi working can be a bit tricky, but it can be done.


As for the actual camera, I am using the Foscam 8910W. You can actually change out the lens on these, so I bought a wider view lens off ebay for $5. A wide view and 480 resolution is not a great combo, but the detail should be good enough. Even with the wider view lens, there is still about a 20 degree area I am missing out on as the camera only rotates so far each way. Will just have to position it to the area I am least like to need to aim it. The camera will look up 90 degrees, so it wont miss much. The pan speed is also adjustable from a slow speed to full rotation in about a second if you wanted. I am using some sliced off pieces of a "pool noodle" to help reduce camera shake within the box. The camera tightens down on the screw and has a little back pressure from the pool noodle to stabilize. To control the camera, it actually opens up in a web browser and can be controlled from there. Also can be control by a smartphone (if you connect the smartphone to that router and set it up on the app). Would definitely need to be a secondary smartphone and not your primary to do that.

Overall I am happy with the build. I definitely could have cut some straighter lines, but the main goal was to keep it cheap. The dome, hinges, and latch were the only items I had to go purchase to build this, as I had the rest just around the house.

 
Update:

I finally got to use it on a couple chases and I think I have a setup that works for me. I tried to use a much more expensive HD (720) Foscam camera that had built-in recording to sd card as well as a greater field of view and turning degrees. The downside to the camera was that with any "HD" IP camera, they have to use the 'rtsp' protocol as the mjpeg format can not handle that the higher quality images due to size. Very few webcam apps handle rtsp still. I tried using Xsplit, but it was very buggy and froze up too much to even think about using. I really liked some of its features with the HD camera, but too many issues to keep up with on a chase.

I went back to my original plan to use the 8910W Foscam .3mp resolution (640 x 480) camera that uses the mjpeg format. It was worked great over the last 2 chases, except there is a 20-30 degree field of view I cant cover. I may have found a cheap $30 replacement camera that is exactly the same on most features, but can turn 350 degrees. I have a wider than stock lens on my current camera, but it is just not enough. Other than that issue, the setup has worked great. Have been told the stream looked good. I have just been recording the stream on my computer. Even with just a dual-core it has been running fine.

I switch my internet from a usb (UML290) to a mifi jetpack (4620LE). It has actually worked smoother this way and the internet has been more consistent with the antenna hooked to the jetpack. Have not had any issues being connected to the jetpack by wifi and to the router for the camera by ethernet.

To control the camera, I am using my tablet with one of the many IP camera apps out there. With a swipe of the touchscreen the camera turns. On top of being able to easily stream from a dome, this has actually worked quite well for being see behind me without having to turn around. Yes, my eyes have to leave the road, but is still much easier than turning around to physically look. The detail has actually been pretty good to tell what is going on.

Below is a picture of how I have the tablet setup. Obviously made for solo chasing, but that is what I do 90% of the time.
IMG_20150315_223457_zps7llkx4m6.jpg
 
Back
Top