Quinton Kirsch
EF0
- Joined
- Dec 26, 2018
- Messages
- 14
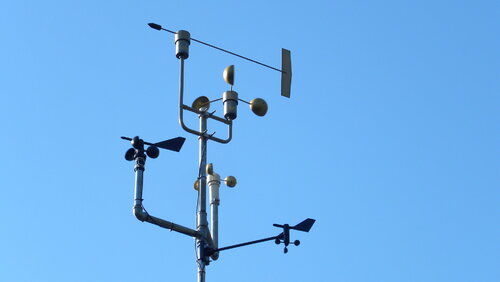
Hi all, this was my weather station setup before I had it taken down due to personal matters. It went through several iterations while it was in service. I was looking through old files and found some pics and thought someone might be interested in them.


.JPG")


.JPG")


For anyone curious, here is the breakdown:
Consumer grade stations:
Davis Instruments Weather Monitor II
Peet Bros Ultimeter 800
Commercially available Sensors:
R. M. Young 05305 AQ, 05103
Texas Electronics TV-114/TV-104-5D
APRS World 6500
Vaisala HMP35C
R. M. Young 61302L
Wind speed and direction were measured using a multitude of instruments. In the beginning a vintage Texas Electronics wind set were used along with the Davis and Peet Bros stations and a random APRS cup set I had. Then removed the APRS and put the 05305 in place. At that time I had an R. M. Young 27600 display hooked up to the AQ. Sold the 05305 and got a 05103, the same one used through the remainder of the mast's life. Experimented with a compact format for a while. Went back to the single tall mast design after acquiring another 05103. Ended up selling the Davis shortly after and decommissioned the Peet Bros, then moved toward a single pipe design that had more height. Ended up going with the single anemometer after because the second one was being used on a mobile mesonet as well to conserve weight and "streamline" the design. This also made it very easy for maintenance as the whole mast could pivot parallel to the edge of the roof.
For a brief period temperature/humidity was measured using an HMP35C. This was housed within a custom fan aspirated radiation shield I made but never truly finished, it was very experimental. The larger plate shield was a Davis 7714 shield and housed the temperature sensor for the Peet Bros station. I had plans to employ a 43408 FARS from Young with their 41382LC2 to measure T/RH.
The rain gauge was from Peet Bros but really just a rebranded 8" one from RainWise. While it met the NWS spec the plastic within the cone was starting to deteriorate as it had been in use for several years prior, so observed measurements were probably suspect.
While pressure measurements were never made operational, a Nishiyama & Bedard quad plate pressure port was employed along with a 61302L. The port was 3D printed and later on I made a modified version similar to Paroscientific's Digiport, consisting of larger outer plates to further mitigate turbulence and pressure perturbation. During that time I also found that during the PAM II project, they utilized the QPPP. One of the scientists found extending the top of the tube it increased overall performance. The vinyl tubing from the pressure port to sensor was put through aluminum collars and zip tied to the mast to prevent any unwanted movement or compression of the hosing.
A Campbell Scientific CR10X logger was used within the house with future plans to mount a weather proof enclosure to the base of the pipe in the last image. That fell through as the whole thing was decommissioned but later on a CR300 was probably going to be used as the final data logger.
The whole goal of this was to mimic an ASOS station or mesonet and have similar capabilities. Though of course, I'll be the first to admit accuracy is probably lacking given the inherent environment and siting requirements are abhorrent compared to real world stations. None of the instruments are calibrated, as I did not have the money/resources/desire to do so at the time as this was purely for personal gain and hobby enjoyment. Sensor placement is less than ideal than I would've liked but because I lived in a heavily suburban neighborhood, I did the best I could with the resources available.
Just a fun project, that's all.
Cheers