tips on taking storm pictures

I would love to see some tutorials on taking lightning photos during the DAY. I wanted to attempt this today, but I have no clue how or if it's even possible.

It would require some rapid shooting and you will have to expose according to what the light meter of the camera says, minus one stop (minus two stops if you expect the lightning to be close) to make a catch during the day unless you are on one of them cells with the lightning that hooks the ground for 2-3 seconds at a time or you will need to use a lightning trigger.

Either way you will generally lose the leaders on a strike and only catch the following pulses. I think the best way to catch a good strike in the daytime will be a darker day with rapid shooting on a very electrically charged storm.

http://www.lightningtrigger.com/

There is supposed to be a do it yourself trigger but I haven't found the links to the good ones.....

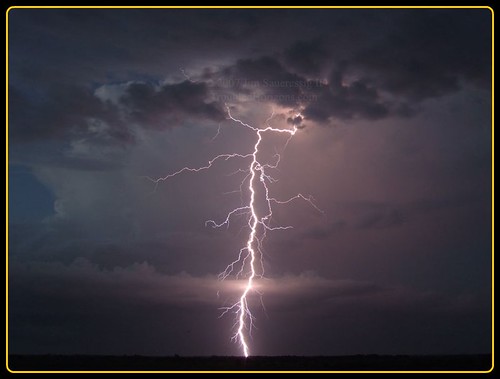
The closest I have come to a daytime shot that looks good is after sunset but before it was too dark. That way you still had some good color.
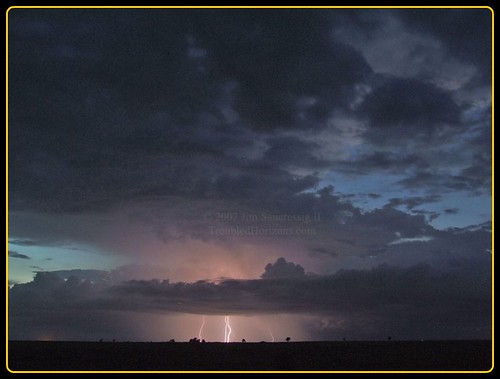
2356311635_8009fc05e5.jpg


2357145242_9b44dacf55.jpg


2356311507_2b7261a192.jpg
 
Last edited by a moderator:
I would like to know exactly how one is suppose to use a Circular Polarizer and have the picture look good.

I tried using a Circular Polarizer yesterday with the sun to my back, which on some site says that's where you would want the sun when using a Circular Polarizer, and I had my camera set on Manual. I put the filter on and no matter what aperture, shutter or ISO I set my camera to the picture either comes out too dark or if I set the exposure higher to compensate for the darker lens of the filter it comes out over exposed.

I guess I'm dumb when it comes to Circular Polarizer, I just can't find a happy medium where ground and sky both look good with great exposure, saturation and the nice clear blue sky.
 
I put the filter on and no matter what aperture, shutter or ISO I set my camera to the picture either comes out too dark or if I set the exposure higher to compensate for the darker lens of the filter it comes out over exposed.

I haven't used once since my film days so I probably cant help much but the issue with the exposure problems makes me think that maybe the polarizer is a cheaper one or maybe it caused an issue with your cameras meter to surface because that sounds odd that you cannot meter it correctly for a shot.
 
Hi Joey,

I think you will generally lose around 2/3's of a stop when using a circular polarizer and DSLR, especially when it is engaged correctly. You can compensate by overexposing slightly, maybe +1/3 EV to +2/3 EV. Different cameras react differently. I find that I have to compensate with my Canon DSLRs. Generally, I spin the polarizer and watch any vegetation in the scene. You should see it become a deeper color. You should also see the sky become darker and more prounounced. Finally, if you have the polarizer spun correctly, you should see any reflections in the scene completely dissappear. My best advice to you is to practice with it at home. They react differently in different situations. Used correctly, they make can really help bring nice contrast into a scene.

James

EDIT: Also, you need to make sure you are using a Circular Polarizer, and not a cheaper Linear if you are shooting with any kind of SLR camera (Digital or otherwise).
 
I use a .9 neutral density filter on my Canon A640 for daylight shots so I can do long exposures. I rairly get to use it since most of my good lightning storm happen at dawn and later. I find using my Canon XTi I get a lot more daytime lightning shots using bulb mode with a remote trigger. There's next to zero write time on my XTi so I can pretty much take none stop shots till I fill up my 16G card and that's a lot of photos! My A640 is my work horse when the rain starts to fall but I did get a water tight case for my XTi.
 
I tried using a Circular Polarizer yesterday with the sun to my back, which on some site says that's where you would want the sun when using a Circular Polarizer, and I had my camera set on Manual. I put the filter on and no matter what aperture, shutter or ISO I set my camera to the picture either comes out too dark or if I set the exposure higher to compensate for the darker lens of the filter it comes out over exposed.

You did turn the polarizer right? You probably did, but I wanted to make sure.

To get a decent lightning picture at night the best exposure is on bulb. Just sit with the aperture wide open and have a low ISO (100) so you don't have to worry about noise. I usually have my camera stopped to around F/3.5 on 18mm. (I have yet to find the money to buy a different lens than the stock one) But it depends on the lightning and how close/bright it is. Adjustments will have to be made to the ISO and Aperture for each situation. If you are shooting with lights in the foreground, then you have to shoot according to those conditions. Too long of an exposure is going to make those lights blow out. You might catch a bolt but the overall shot will look bad because of those lights.

Pretty much you're going to have to experiment. Reading tips only gets a person so far, eventually you just have to go out and try it. And besides, it's fun to do!!
 
For normal cloud shooting of the non electrical kind you really need to learn blending exposures to get a good dynamic range to get the clouds and the sky to look like it does or your eye.

Put your camera on a tripod. Set it to bracket -1 0 +1, or any range that will give you a good range for the scene. I usually use -2,-1, and 0. Make sure you are on the fast shooting mode, not single shot, and let 'er rip. Then you get to play in photoshop: http://www.luminous-landscape.com/tutorials/blended_exposures.shtml

That tutorial is a bit dated, but still a good one to learn the basics.
 
I would like to know exactly how one is suppose to use a Circular Polarizer and have the picture look good.

I tried using a Circular Polarizer yesterday with the sun to my back, which on some site says that's where you would want the sun when using a Circular Polarizer, and I had my camera set on Manual. I put the filter on and no matter what aperture, shutter or ISO I set my camera to the picture either comes out too dark or if I set the exposure higher to compensate for the darker lens of the filter it comes out over exposed.

I guess I'm dumb when it comes to Circular Polarizer, I just can't find a happy medium where ground and sky both look good with great exposure, saturation and the nice clear blue sky.


Try this: Assuming you have a LCD monitor on your computer, sit in front of it and turn the circular polarizer (CP) until your computer monitor goes black. This doesn't really teach you anything, but it is kind of fun:D

People can tell you till they're blue in the face about turning the arrow on the CP so it is 90 degrees to the sun and whatnot, but everyone simply turns it until they get the desired effect in the viewfinder. The CP will not magically extend the dynamic range of an image. It only eliminates the stray light and reflections. In an image exposed for the clouds, it might gain you some richness to the color of the sky, but it won't do anything to improve the dynamic range enough to properly expose the ground. The only way to extend the DR of an image is to post-process the image using dynamic range tools like HDR, shadows/highlights, or blending multiple images.

It takes time to see like the camera. Luckily, with digital, film is cheap.
 
Last edited by a moderator:
The only way to extend the DR of an image is to post-process the image using dynamic range tools like HDR, shadows/highlights, or blending multiple images.

It takes time to see like the camera. Luckily, with digital, film is cheap.

You can also try using a gradiated filter -- I don't use them, but a lot of landscape photographers swear by them.

One of the best tips I can give for storm photography is to use wide angle and abandon the rule of thirds. That is, shoot wide to get the amazing structure of the storm -- and, unless your forground is incredibly interesting, don't give the ground 1/3 of the image composition, give it 1/5th or even less. The sky looks much, much larger (like it is in real life) when you only leave a sliver of ground at the bottom of the picture.
 
I would love to see some tutorials on taking lightning photos during the DAY. I wanted to attempt this today, but I have no clue how or if it's even possible.

I may work on a daytime lightning tutorial over the next few weeks. It really just comes down to effort. The best daytime lightning I have gotten is without any filters and putting the camera settings to allow for the longest possible exposure. If its less than 1/2 of a second or so then I usually will put on a ND .9 and if its still too short I will go with my ND 3.0 (10 F stops!). The ND 3.0 pretty much kills everything but the main stroke but its a lot easier having so much fewer pictures to deal with.

Using ND 3.0 to allow 4 sec exp
http://www.realclearwx.com/images/060108004.jpg

Without filter clicking away at 1/3 second exp
http://www.realclearwx.com/images/03130803.jpg
http://www.realclearwx.com/images/03130807.jpg

Other non filter daytime lightning
http://www.realclearwx.com/images/04220803.jpg <lightning at sunset
http://www.realclearwx.com/images/03eee.jpg <4 strikes in 1.6 seconds
http://www.realclearwx.com/images/04eee.jpg <along shelf cloud
 
I've stopped using filters for the most part because of loss of stops under most storms. They're great for taking photos of white cumulus or for glare problems, but when I'm under a storm base, I've got whatever lens on the camera opened up all the way. FWIW, here are my suggestions for general storm photos -

1. Shoot in Av mode with the lens opened to its widest aperature.

2. Focus on a distant object first, then lock the lens on manual focus. Be sure to do this every time you move a zoom lens.

3. Bracket your shots. It only takes a second to turn on auto-bracketing, and then you'll seldom have to worry about exposure problems again.

4. I agree with Ryan, that the sky deserves the weight of most storm images, so rule of 3ds can go bye bye. Include just enough land to provide basic details about your surroundings. If there is something neat you can include in the foreground, DO IT. By all means. A barn, a windmill, a silo, a horse. And try to keep that object about a third the way in from either side of the shot.

5. Avoid powerlines, and distracting elements. If there isn't something 'cool' to put in the foreground, just stick with the basics, land and sky.

6. Always shoot in RAW format and preserve the originals when processing.

7. Shoot a variety of compositions for each shot. I normally frame every shot at least three times with slight variations, so I can pick the one I like best later.

8. Learn how to use layers, curves and levels.

9. Almost forgot this: ALWAYS check your ISO before EVERY chase.
 
Camera tips and tricks

Tip 1: Invest in a very good tripod and then make sure you hang a sand bag, water bag, etc from center. Gusting winds have taken down more than one camera.

Tip 2: Get some 2 gallon freezer bags for equipment safety. Great for storms.

Tip 3: EXPERIMENT! Yes, Program mode will give you flexibility. Aperture Priority will give you great results and, of course, totally manual for all is the answer for the experienced user.

Also, don't forget that some DSLRs do well with pre-programmed modes like landscape. Things have come a long way in computerized exposure/speed compensation since I started in the 1950's.

Mike Davis
Graduate, Kodak Forensic Photgraphy School
 
9. Almost forgot this: ALWAYS check your ISO before EVERY chase.

LOL, Mike, I've learned this lesson the hard way. I once shot 75 great photos thinking that I had ISO 100, only to find out in PP that I had it set at 800. When I had the camera hanging around my neck, the buttons on the back of my Rebel must have leaned up against my chest and changed the settings. :eek:

Noise City.

Melanie

Oh wow, now I had a similar incident. I was using my A640 and it has a fairly long write time of about 10 seconds. I was getting really annoyed that I was missing several massive lightning strikes so I grabbed my old Sony 770 and set it on the other tripod to capture images while the canon was writing. It seemed like every fantastic lightning image was happening during my Sony's capture time. So I was happy my old work horse was earning it's keep once again. That was until my memory card filled up... I pulled the camera off the tripod to hook it to my laptop and then I noticed the lens cap was still on. :o

That lens cap is now in the trash. :cool:
 
Back
Top