True. And my D750 also has multiple noise reduction settings that essentially denoise shots immediately upon capture. I have tended not to use them out of fear of feeling like I'm pre-"post"-processing my images (before they even come off the camera's card), but perhaps I should let go of that.That's one area where newer cameras really excel at - low-light performance. Having to worry about ISO so much is becoming more of a thing of the past. Especially with Denoise in Lightroom, it can take an ISO 6400 image and clean it up real nicely if the photo is too grainy for your liking.
-
While Stormtrack has discontinued its hosting of SpotterNetwork support on the forums, keep in mind that support for SpotterNetwork issues is available by emailing [email protected].
You are using an out of date browser. It may not display this or other websites correctly.
You should upgrade or use an alternative browser.
You should upgrade or use an alternative browser.
General settings/lens setups on your camera?
- Thread starter ChristofferB
- Start date
Ryan Schwartz
EF1
True. And my D750 also has multiple noise reduction settings that essentially denoise shots immediately upon capture. I have tended not to use them out of fear of feeling like I'm pre-"post"-processing my images (before they even come off the camera's card), but perhaps I should let go of that.
If you shoot JPEG, then it will utilize any noise reduction settings turned on in the camera. Raw will bypass any in-camera processing and that's where post-processing comes into play.
I see this thread from a ways back revived.
I'd like to chime in and suggest everyone learn to shoot full manual even on a phone (except autofocus in some scenarios) with in camera denoise and corrections off, and ALWAYS store in RAW if available. I vehemently disagree that auto mode is as good or better than telling the camera what you really want. Full auto mode has no idea what you are trying to capture and will fail as often as not to capture what you think you are getting. There is no shame in using auto until you learn or in scenarios where it may not matter, but it severely limits getting the best images. Relying on fixed settings will always fall short because light and distance and rate of change of things we are trying to capture is always changing. Forcing the camera to guess a combo of settings that yields perfect amount of light (exposure) is too unpredictable. Cameras have no idea if you want to freeze motion first, have perfect depth of field, etc.
JPEG should be avoided as it has everything baked into it from the camera correction settings and cannot be fixed. RAW retains original sensor capture data and can recover highlights or shadows, change white balance, and still correct distortion or noise later, as well as having much more resilience when editing in post before pixelation and artifacts occur. Warning: some things are baked into the RAW file like in camera denoise, which may lose detail, and also causes delay in processing so you cannot shoot quickly between longer exposures.
The 3 exposure controls to learn are quite simple, and they each have one primary function and secondarily affect amount of light gathered. If you change one of these 3 settings up or down an exposure increment, another must be moved up or down the same amount in the opposite direction to have the same amount of light gathered. You really only need to learn these 3 settings, plus focusing, and shoot in RAW to open a world of better images. It is much simpler than it seems. I fumble a lot in the field and I still managed to mostly master these, so anyone can learn:
Aperture controls depth of field (how much near to far is in focus) but also affects how much light is gathered. If you want a close object and far object both in focus, you increase aperture until they are- a higher F number setting narrows the aperture opening producing more depth of field. If you want maximum light gathering or intentional shallow depth of field, set aperture F number as low as possible for a given lens. Some lenses open to F4, others to F2.8, 2, 1.4, etc. The smaller the F number of the lens aperture the more light a lens can collect. These low F number lenses are also called fast lenses due to how fast they collect light, and you want one for chasing. F2.8 or faster wide as possible lens suggested if you can fit into your budget.
Shutter speed should be set to freeze motion sufficiently (if there is any in scene) while still gathering enough light. Unless you are intentionally trying to capture lightning or some other effect where long exposure time is needed, shoot as fast as able while not darkening the scene too much. For example if you are moving in a car, you have no choice to avoid total blur of near objects: you need to shoot at least 1/500 or faster to freeze that scene. If you are handheld standing, you only need to shoot around 1/100s generally to not have blur from your hands shaking imperceptibly - some newer systems can shoot slower shutters handheld with stabilizer features in camera or lens. If you want to freeze fast cloud updraft or rotational motion for example, you need to have a shutter faster than probably 1/8 sec to get crisp cloud edges rather than motion blurred clouds. If you want to brighten a scene that is too dark, or get lightning, or blur water surface to look smooth - slower shutter speed until you get what you want.
ISO adjust the sensor amplifier effectively increasing the apparent light gathered, similar to film speed of old. Always set this last, always. Adjust it only as high as needed for proper exposure brightness without going so high that the image is a noisy mess. On newer cameras, acceptable images are had from 3200-6400 and beyond. For cleaner images around storms, if able try to stay below ISO 1600 - the lower the better. Older cameras perform worse but the general rule is the same: low ISO=low noise, you always want that. However, be willing to adjust upward to keep your other two exposure settings as needed for depth of field and motion capture, and don't be afraid of mid or high ISO - software cleanup is amazing these days.
The last thing to learn is how to balance these 3 controls when conditions are not ideal, such as slight trade-offs between them. Or, you can take multiple images at different settings and blend in software but that is an advanced procedure and not needed so often with todays cameras.
Focusing I will add that focusing is another fourth thing to learn for great images. For perfect focus you have to have the depth of field (aperture) number high enough, and also get your focus point right. Setting up your camera with joystick, arrow buttons, or touch screen (whatever your model supports) to move a central focus point or group of points manually to where you want is essential. It is really easy to learn with just a bit of setup that you do only one time, and a bit of practice before it is second nature. For example, I want distant lightning and supercell in perfect focus. I choose a distant light pole and place my autofocus point on it. If there is enough light, the autofocus does my work for me. If not, I can go to manual focus, zoom in on live view, and get perfect focus, and then leave the lens on that perfect focus until I change subjects and have to refocus. If this sounds hard, autofocus is pretty good until it gets dark these days, so don't worry. However, you want to tell the camera what is important to be in focus. Just praying and spraying with most autofocus unconfigure with many dozens of focus points is likely to get something blurry.
Tripods are essential for long exposure success or timelapse. They certainly are not required for sharp good images, but they can help and give you latitude to slow down shutter speed, reduce camera shake, etc. A nice heavy one with a quick release ball head is the best for storm chasing where you need to get setup quick. I leave my camera on tripod, partially extended in the back seat (pillow for it to rest on) and yank it out fast when needed). Set height not for your comfort, but for how you want objects to relate in the image. Get low, get high, be creative!
I have to re-emphasize, give a few outings not under pressure (dedicate a weekend trip to the lake or something) to learning these controls and basics, it really is not hard and will empower you. Anyone can do it, and it will become second nature. Knowing these will apply to so many cameras, and flows into video camera use and also opens up editing possibilities. You will get much better results for years to come by putting in the time and not letting manual mode intimidate.
Editing is a vast topic I will not get into here, but contrast, fine to coarse detail, white balance, color, dust and spot removal, and so much more is all possible to be done in post. That is for another thread.
For anyone who feels manual settings and taking control is not worth it or intimidating, I assure you it IS worth it and not hard to learn, just takes time. You might have to make a couple one time settings in your camera to make it easier. Many cameras let you make scenarios of settings and save those to be recalled as a preset very fast. I am happy to give anyone suggested specific settings for various scenarios if you have them, ether here or message me. I always enjoy learning from other or talking photo stuff. I'm still in the middle of my own photo journey and have a ton to learn too.
I will end this opinion/persuasion piece for taking control of your camera with a few examples of images I likely could not have gotten just right in any partial or full auto mode. I am not trying to showcase my stuff here; Hopefully you can see the balancing act in each image that was done over freezing motion (shutter) in scene, aperture (depth of field and light gathering), ISO (amplifier recovering brightness at expense of noise).
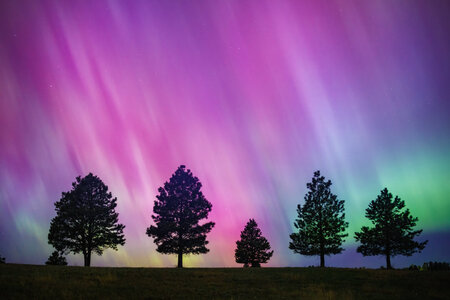
Distant aurora and stars, had to make sure that and trees were in focus, with aperture wide enough to capture enough aurora light. F2.2 for depth of field, 3 seconds shutter to gather some light without too much aurora blur, ISO 1600 to recover some light at trade of noise that was easily cleaned in post. Focus was on star manually for infinite focus, and checked that depth of field was enough for trees to also be in focus at F2.2; it was.
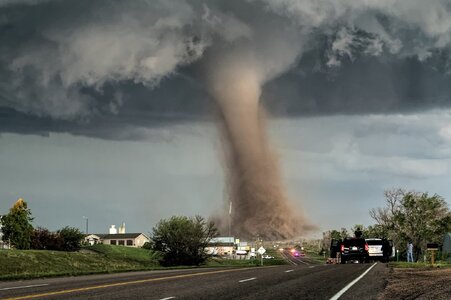
To avoid a blurry mess, shutter speed of 1/100 for this hand held shot. It was dark under the meso, so ISO was 800 or 1600 I believe. Aperture was F5.6 with focused point set on the hard edges in the distance since nothing close was requiring more depth of field.
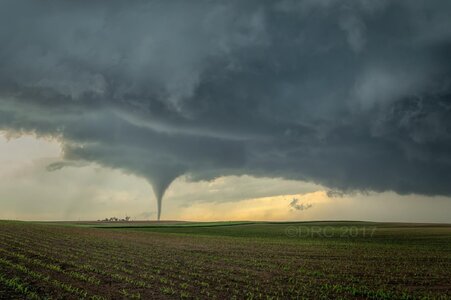
To get close crop rows and tornado in focus, set aperture first at F8 for depth of tield. Then set shutter to ~1/60 (tripod) and ISO was around 400 or 640. Focus point manually set on the farm at effectively infinity.
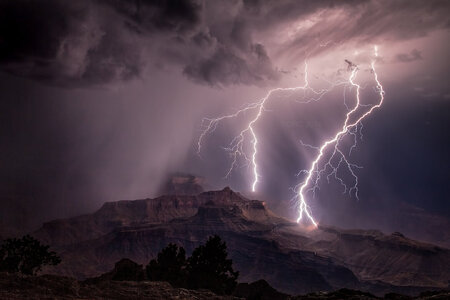
8 second exposure to get some foreground to illuminate enough during flashes and capture two strikes. Aperture was F8 to avoid lightning blowouts (less light, smaller hole) and to keep close bushes and far rocks in focus. Focus point was set manually on a distant object and autofocus then disabled for this series of shots, so that all shots at similar distance are in perfect near and far focus.
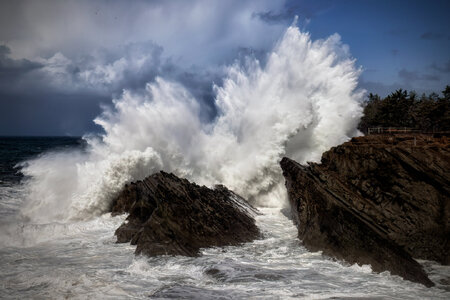
To get wave motion smooth but not blurry, I first set shutter to 1/25 sec. Then Aperture was F4 since nothing was too close- I did not need much depth of field. ISO was daytime so around 1/100. Focus point was the hard edges of the fence and rocks, and not on something moving like water which would confuse autofocus.
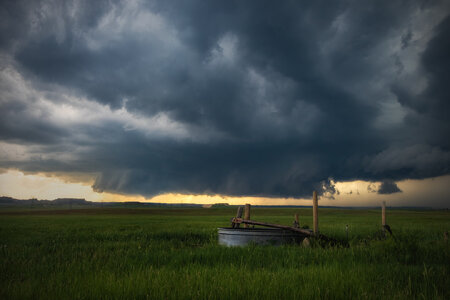
Close and far objects and I wanted both in focus. Upped F stop to F8 for depth of field, boosted ISO to 400. No fast motion so shutter was able to be slower and recover some light lost with the F8 setting, without boosting ISO and costing more noise.
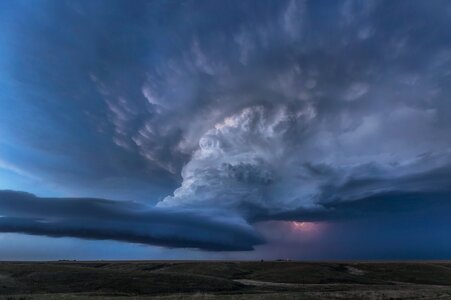
Here nothing was close so wide open aperture on a 14mm F2 lens was fine for shallower depth of field as long as I focused first on the farm in the distance. I then disabled autofocus since I was on a tripod and not changing distance to subject. However, rotation motion was fast on the updraft and blurred easily until I set to around 1/10sec. Had to boost ISO to 1600 to recover light from the faster shutter as the scene was really darkening at blue hour, and I needed the light recovery even with the cost of noise.
I hope this helps someone! If not, apologies for the long winded post.
I'd like to chime in and suggest everyone learn to shoot full manual even on a phone (except autofocus in some scenarios) with in camera denoise and corrections off, and ALWAYS store in RAW if available. I vehemently disagree that auto mode is as good or better than telling the camera what you really want. Full auto mode has no idea what you are trying to capture and will fail as often as not to capture what you think you are getting. There is no shame in using auto until you learn or in scenarios where it may not matter, but it severely limits getting the best images. Relying on fixed settings will always fall short because light and distance and rate of change of things we are trying to capture is always changing. Forcing the camera to guess a combo of settings that yields perfect amount of light (exposure) is too unpredictable. Cameras have no idea if you want to freeze motion first, have perfect depth of field, etc.
JPEG should be avoided as it has everything baked into it from the camera correction settings and cannot be fixed. RAW retains original sensor capture data and can recover highlights or shadows, change white balance, and still correct distortion or noise later, as well as having much more resilience when editing in post before pixelation and artifacts occur. Warning: some things are baked into the RAW file like in camera denoise, which may lose detail, and also causes delay in processing so you cannot shoot quickly between longer exposures.
The 3 exposure controls to learn are quite simple, and they each have one primary function and secondarily affect amount of light gathered. If you change one of these 3 settings up or down an exposure increment, another must be moved up or down the same amount in the opposite direction to have the same amount of light gathered. You really only need to learn these 3 settings, plus focusing, and shoot in RAW to open a world of better images. It is much simpler than it seems. I fumble a lot in the field and I still managed to mostly master these, so anyone can learn:
Aperture controls depth of field (how much near to far is in focus) but also affects how much light is gathered. If you want a close object and far object both in focus, you increase aperture until they are- a higher F number setting narrows the aperture opening producing more depth of field. If you want maximum light gathering or intentional shallow depth of field, set aperture F number as low as possible for a given lens. Some lenses open to F4, others to F2.8, 2, 1.4, etc. The smaller the F number of the lens aperture the more light a lens can collect. These low F number lenses are also called fast lenses due to how fast they collect light, and you want one for chasing. F2.8 or faster wide as possible lens suggested if you can fit into your budget.
Shutter speed should be set to freeze motion sufficiently (if there is any in scene) while still gathering enough light. Unless you are intentionally trying to capture lightning or some other effect where long exposure time is needed, shoot as fast as able while not darkening the scene too much. For example if you are moving in a car, you have no choice to avoid total blur of near objects: you need to shoot at least 1/500 or faster to freeze that scene. If you are handheld standing, you only need to shoot around 1/100s generally to not have blur from your hands shaking imperceptibly - some newer systems can shoot slower shutters handheld with stabilizer features in camera or lens. If you want to freeze fast cloud updraft or rotational motion for example, you need to have a shutter faster than probably 1/8 sec to get crisp cloud edges rather than motion blurred clouds. If you want to brighten a scene that is too dark, or get lightning, or blur water surface to look smooth - slower shutter speed until you get what you want.
ISO adjust the sensor amplifier effectively increasing the apparent light gathered, similar to film speed of old. Always set this last, always. Adjust it only as high as needed for proper exposure brightness without going so high that the image is a noisy mess. On newer cameras, acceptable images are had from 3200-6400 and beyond. For cleaner images around storms, if able try to stay below ISO 1600 - the lower the better. Older cameras perform worse but the general rule is the same: low ISO=low noise, you always want that. However, be willing to adjust upward to keep your other two exposure settings as needed for depth of field and motion capture, and don't be afraid of mid or high ISO - software cleanup is amazing these days.
The last thing to learn is how to balance these 3 controls when conditions are not ideal, such as slight trade-offs between them. Or, you can take multiple images at different settings and blend in software but that is an advanced procedure and not needed so often with todays cameras.
Focusing I will add that focusing is another fourth thing to learn for great images. For perfect focus you have to have the depth of field (aperture) number high enough, and also get your focus point right. Setting up your camera with joystick, arrow buttons, or touch screen (whatever your model supports) to move a central focus point or group of points manually to where you want is essential. It is really easy to learn with just a bit of setup that you do only one time, and a bit of practice before it is second nature. For example, I want distant lightning and supercell in perfect focus. I choose a distant light pole and place my autofocus point on it. If there is enough light, the autofocus does my work for me. If not, I can go to manual focus, zoom in on live view, and get perfect focus, and then leave the lens on that perfect focus until I change subjects and have to refocus. If this sounds hard, autofocus is pretty good until it gets dark these days, so don't worry. However, you want to tell the camera what is important to be in focus. Just praying and spraying with most autofocus unconfigure with many dozens of focus points is likely to get something blurry.
Tripods are essential for long exposure success or timelapse. They certainly are not required for sharp good images, but they can help and give you latitude to slow down shutter speed, reduce camera shake, etc. A nice heavy one with a quick release ball head is the best for storm chasing where you need to get setup quick. I leave my camera on tripod, partially extended in the back seat (pillow for it to rest on) and yank it out fast when needed). Set height not for your comfort, but for how you want objects to relate in the image. Get low, get high, be creative!
I have to re-emphasize, give a few outings not under pressure (dedicate a weekend trip to the lake or something) to learning these controls and basics, it really is not hard and will empower you. Anyone can do it, and it will become second nature. Knowing these will apply to so many cameras, and flows into video camera use and also opens up editing possibilities. You will get much better results for years to come by putting in the time and not letting manual mode intimidate.
Editing is a vast topic I will not get into here, but contrast, fine to coarse detail, white balance, color, dust and spot removal, and so much more is all possible to be done in post. That is for another thread.
For anyone who feels manual settings and taking control is not worth it or intimidating, I assure you it IS worth it and not hard to learn, just takes time. You might have to make a couple one time settings in your camera to make it easier. Many cameras let you make scenarios of settings and save those to be recalled as a preset very fast. I am happy to give anyone suggested specific settings for various scenarios if you have them, ether here or message me. I always enjoy learning from other or talking photo stuff. I'm still in the middle of my own photo journey and have a ton to learn too.
I will end this opinion/persuasion piece for taking control of your camera with a few examples of images I likely could not have gotten just right in any partial or full auto mode. I am not trying to showcase my stuff here; Hopefully you can see the balancing act in each image that was done over freezing motion (shutter) in scene, aperture (depth of field and light gathering), ISO (amplifier recovering brightness at expense of noise).

Distant aurora and stars, had to make sure that and trees were in focus, with aperture wide enough to capture enough aurora light. F2.2 for depth of field, 3 seconds shutter to gather some light without too much aurora blur, ISO 1600 to recover some light at trade of noise that was easily cleaned in post. Focus was on star manually for infinite focus, and checked that depth of field was enough for trees to also be in focus at F2.2; it was.

To avoid a blurry mess, shutter speed of 1/100 for this hand held shot. It was dark under the meso, so ISO was 800 or 1600 I believe. Aperture was F5.6 with focused point set on the hard edges in the distance since nothing close was requiring more depth of field.

To get close crop rows and tornado in focus, set aperture first at F8 for depth of tield. Then set shutter to ~1/60 (tripod) and ISO was around 400 or 640. Focus point manually set on the farm at effectively infinity.

8 second exposure to get some foreground to illuminate enough during flashes and capture two strikes. Aperture was F8 to avoid lightning blowouts (less light, smaller hole) and to keep close bushes and far rocks in focus. Focus point was set manually on a distant object and autofocus then disabled for this series of shots, so that all shots at similar distance are in perfect near and far focus.

To get wave motion smooth but not blurry, I first set shutter to 1/25 sec. Then Aperture was F4 since nothing was too close- I did not need much depth of field. ISO was daytime so around 1/100. Focus point was the hard edges of the fence and rocks, and not on something moving like water which would confuse autofocus.

Close and far objects and I wanted both in focus. Upped F stop to F8 for depth of field, boosted ISO to 400. No fast motion so shutter was able to be slower and recover some light lost with the F8 setting, without boosting ISO and costing more noise.

Here nothing was close so wide open aperture on a 14mm F2 lens was fine for shallower depth of field as long as I focused first on the farm in the distance. I then disabled autofocus since I was on a tripod and not changing distance to subject. However, rotation motion was fast on the updraft and blurred easily until I set to around 1/10sec. Had to boost ISO to 1600 to recover light from the faster shutter as the scene was really darkening at blue hour, and I needed the light recovery even with the cost of noise.
I hope this helps someone! If not, apologies for the long winded post.
Last edited:
Jamie H
EF3
That is an outstanding post. Thank you for taking the time!
Similar threads
- Replies
- 12
- Views
- 2K
- Replies
- 11
- Views
- 923
- Replies
- 21
- Views
- 4K
